Tuesday, February 14, 2012

Adventures in Quilting

I have officially been bitten by the quilting bug (or is it stung by the quilting bee? =P). The finish-up to the class went rather rocky. we were in the middle of the store with two tables placed in the middle of an isle. We had 1 sewing machine between 3 people and very limited space. Also, since the finish-up class was scheduled on a Saturday, the store was busy and we were interrupted frequently by customers asking questions about where to find stuff in the store....sigh. I loved the teacher but the class did not seem well prepared at all. However, I was sufficiently struck by the fun and possibilities of quilting and am so excited working on these projects.
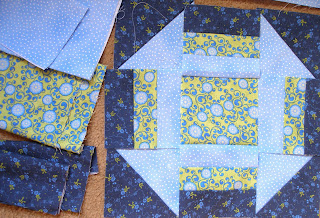
So, here is my lovely little messed up block from the class. I think its a variation on the Churn Dash Block. After everything was put together the block is about an inch smaller than it is supposed to be. So into the scrap pile it will most likely go. I do like the block alot and I definitely learned alot about the importance of being careful and precise.

The block is supposed to have a border but as you can see the border does not match up to my block. The border is supposed to be the same length as the sides of my block...oh well.

I have also started to make a bunting. Oooh it's just too cute and fun. I am getting married in October and am making this adorable bunting to hang on the cake table at our reception. This project is small enough that it lets me try different techniques and is super quick to make. I am using various designs and also decided to try my hand at English Paper Piecing with the hexagons. It is very interesting, but relatively easy. Especially with time saving techniques of using freezer paper and a washable glue stick.

My bunting template made out of template plastic.

While I've been cutting the fabric for the bunting I've also been making some extra hexagons to maybe make a table runner or pillow.

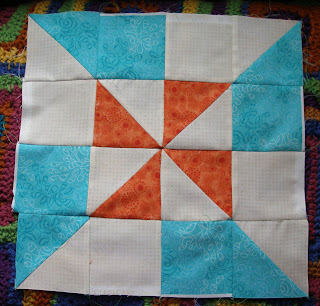
This is my latest project. Oh how I absolutely love it! I found this lovely little blog  that has a pinwheel sampler quilt and a link to a website of free quilt block patterns with more pinwheel blocks to expand on the pinwheel sampler. My mother is also making one and we are doing it in a Block of the Month manner so we can take a nice slow 2 blocks per month construction.

I am so pleased with these blocks. Especially after the issue with the class block. I've been extra careful on paying attention to my seam allowances. This is Block 2 and the one above it is Block 1. I was alot more adventurous with the colors on the 2nd one, but I love them both. It is so hard to stop at just 2 a month.
Wednesday, February 8, 2012

Busy, Busy Cleaning Days....

Oh blog, how I have neglected thee...This past week has had me feverishly cleaning my mom's house. She is wanting to move in the near future to be closer to me and my fiance, so the house must be cleaned! She has graciously offered to pay me since I am currently without a job and the cleaning/organizing is a huge undertaking.
2 years ago a flood hit Nashville. We count ourselves so lucky to have not had more damage than we did. My mom's house is situated on an incline in a subdivision with a basement/garage combo built into the incline. Ours is the only house in the subdivision like that and so was the only one in the subdivision with damage when the basement/garage was flooded with 3ft of water. I was living with my mom at the time while attending college full time. My studio was unfortunately located in the basement. So I lost nearly all of my supplies/artwork and my two cars that were parked in the garage and driveway. We didnt have flood insurance on the house but fortunately the cars did. But again, I count us so lucky to have such minor damage compared to others.
My mom is a keeper of all things memory related and a collector of craft supplies. half of the garage and basement was full of boxes of these two things. She was able to clear out alot while I was away at a work/study program that summer, but stopped when she started finding pictures and other things from when I was a baby. So, I am continuing the efforts now. I am also organizing the monumental collection of crafts, magazines, and books that are upstairs in the living room and a spare room. After a 1hr drive one way and 6-7hrs worth of work, I am sufficiently beat! So, my crafting has grinded to a complete halt as of late. /sigh
I am really interested in the one a day projects that I have spied on a few blogs and I think I am definitely in need of that little bit of time each day to craft. I will attempt to start this on Friday, as I am staying home for a much anticipated new washing machine. I am so excited to be getting a new one. We've been battling the old one for the past year.
So much to do, but I am looking forward to my little Friday craft break.  :)

Wednesday, January 25, 2012

Ridge Wall Crochet Block

Here is the pattern to make this fun little blanket block.
Materials: Size I/9/5.5mm hook, worsted weight yarn 6 colors per block, yarn needle.
I use US terms.
In case you haven't done the bpdc stitch before here is a little description.
bpdc:back post double crochet: when starting the stitch, instead of going through the "v" at the top of the stitch of the previous row, go from the back of the block and around the post of the stitch.
R1: With first color, 12 dc in a magic circle, BO (12)R2: With next color, ch4, tr in same space, ch1, *(tr, ch1, tr), ch1, tr, ch1*, repeat around and BO (18)
R3: With next color, 2sc in each ch space around (36)
R4: With same color, (ch3, dc, tr, 2dc), dc2, hdc, sc2, hdc, dc2, (2dc, tr, 2dc), dc2, hdc, sc2, hdc, dc2, (2dc, tr, 2dc) dc2, hdc, sc2, hdc, dc2, (2dc, tr, 2dc), dc2, hdc, sc2, hdc, dc2, BO (52)
R5: With next color starting in tr space (ch3, dc, ch3, 2dc), dc12, (2dc, ch3, 2dc) in tr space, dc12, (2dc, ch3, 2dc) in tr space, dc12, (2dc, ch3, 2dc) in tr space, dc12, BO (64+4 ch spaces)
R6: With next color starting in ch3 space (ch3, dc, ch2, 2dc), dc, bpdc14, dc, (2dc, ch2, 2dc) in ch3 space, dc, bpdc14, dc, (2dc, ch2, 2dc) in ch3 space, dc, bpdc14, dc, (2dc, ch2, 2dc) in ch3 space, dc, bpdc14, dc, BO (80+4 ch spaces)
R7: With next color starting in ch2 space (ch3, dc, ch2, 2dc), dc20, (2dc, ch2, 2dc) in ch2 space, dc20, (2dc, ch2, 2dc) in ch2 space, dc20, (2dc, ch2, 2dc) in ch2 space, dc20, BO (96 +4 ch spaces)

Feel free to use this pattern to make your own blocks and projects, but please do not sell the pattern or completed piece. I hope everything is correct, but if you see anything that needs fixing, let me know. Also, I would love to see your completed blocks.
Happy crocheting!


Drawings and Quilty Goodness

The latest in a new series I have started. I've always loved and feared(traumatizing childhood experience with a cockatoo) birds of all sorts. I'm excited about this series since I've decided to incorporate some embroidery with it. Oooo such fun.

Such lovely and oddly colored orchids my mom found at a grocery store and brought over before our trip to the quilt class. I have an obsession with all things mustard yellow. Don't know why, I've just loved the color for such a long time and my mom picked these up when she spotted the color. I absolutely love having flowers and plants in the house.

So, here is my lovely unfinished quilt square. I still have to join the side squares into strips to get to a stopping point. After 3.5 hours we still didn't finish our blocks so I have to go back on February 4th for a quick 1 hour class to join the strips and make the border. I think I have been bitten by the quilting bug. Oh how I want to make a full sized quilt! So exciting and much less intimidating than I thought it would be. However, I did manage to mess up on my seam allowances and had to make all of my individual squares a half inch smaller. Sigh...

Oh look at this yummy stack of fabric!!!!!!
It makes me just squeal with delight at all the possibilities. Most of it is destined to become a cute little wedding bunting. I am getting married this year in October and I want to make a bunting to hang in the trees or around the buffet table at the reception. The wedding colors are blue and of course my favorite yellow. :)
My biggest dilemma at the moment is what shape to use and what pattern to quilt them in. Decisions decisions.....

Thursday, January 19, 2012

Snail Amigurumi!!!

Aint he just the cutest thing you've ever seen!!!
I started this little guy yesterday on a whim. I didnt have a pattern but just went off of the instructions for making a basic bowl, which made him pretty easy to make. Use a stitch marker to mark the beginning of each of your rounds as the shell and body are completed in a spiral. Also, stuff as you go. Hope you are ready for the instructions because here we go!!!.......

Materials: F/5/3.75mm hook, worsted weight yarn 4 colors, fiberfill or other stuffing, yarn needle.
I use US terms.
First off is to make the shell.
R1: Ch2, 6sc in 2nd chain from hook (6)
R2: 2sc in each sc around (12)
R3: *sc1, 2sc in next sc*, repeat around (18)
R4: *sc2, 2sc in next sc*, repeat around (24)
R5: *sc3, 2sc in next sc*, repeat around (30)
R6: *sc4, 2sc in next sc*, repeat around (36)
R7: *sc5, 2sc in next sc*, repeat around (42)
R8: *sc6, 2sc in next sc*, repeat around (48)
R9-R14: sc 48 around(48)
R15: *sc6, dec1*, repeat around (42)
R16: *sc5, dec1*, repeat around (36)
R17: *sc4, dec1*, repeat around (30)
R18: *sc3, dec1*, repeat around (24)
R19: *sc2, dec1*, repeat around (18)
R20: *sc1, dec1*, repeat around (12)
Repeat R20 until closed.

This is what you should have!

Now for the body. Stuff the head firmly but leave the tail stuffing a bit looser. The body starts off just like the shell.
R1: Ch2, 6sc in 2nd chain from hook (6)
R2: 2sc in each sc around (12)
R3: *sc1, 2sc in next sc*, repeat around (18)
R4: *sc2, 2sc in next sc*, repeat around (24)
R5-R25: sc 24 around (24)
R26: *sc10, dec1*, repeat around (22)
R27: sc 22 around (22)
R28: *sc9, dec1*, repeat around (20)
R29: sc 20 around (20)
R30: *sc8, dec1*, repeat around (18)
R31: *sc7, dec1*, repeat around (16)
R32: *sc6, dec1*, repeat around (14)
R33: *sc5, dec1*, repeat around (12)
R34: *sc4, dec1*, repeat around (10)
R35: *sc3, dec1*, repeat around (8)
R36: *sc1, dec1*, repeat around (6)
Repeat R36 until closed.

Place a stitch marker about 4 rows below top of bigger end. This marks the bottom.

Start about 4 rows from the end of the smaller end of the snail body. Slip stitch, then sc up the side of the snail body. It helps to flatten the body out so the side is easier to see and get to. About 2/3 of the way up the side, as shown in above picture, start moving to your stitch marker. reverse down the other side of the body.

The body should then look like this. Now for the side frills. Grab another color. Start about 4 stitches up from the bottom of the ridge you just made. Slip stitch on, then sc1, 3dc in next stitch, sc1, slst1, sc1, 3dc in next stitch, sc1, slst 1, sc1, 3dc in next stitch, sc1, slst1, sc1, 3dc in next stitch, sc1, slst 2, and bind off.
Repeat for other side.

This is what the frills look completed.
Time for antanae.
Slip stitch on with body color on the top of the head, off center a bit. Ch 4 for the longer ones and Ch2 for the shorter ones. Bind off and tie a knot. Then weave in the end straight down the length of the antanae and into the body.
I then added a zig-zaggy line to both sides using the same yarn as the frill.

He's even super cute as a slug!!!!!


Attach the shell and embroider a spiral to both sides of the shell. I just used yarn for this.
Weave in any other ends you may have and Voila!!!! A super cute and adorable snail buddy :)


Feel free to use this pattern to make your own snail buddy but please do not sell the pattern or completed piece. This is my first pattern, so I hope everything is correct, but if you see anything that needs fixing, let me know. Also, I would love to see your completed snail buddies.

Wednesday, January 18, 2012

Giddy with excitement...

I will be attending a quilting class this Saturday at Joann's Craft Store with my wonderful mother who signed us up as a birthday gift. I mentioned that  have wanted to learn to quilt for a while and she said the same. I'm so excited and slightly scared. haha. Cutting things with precision has never been my strong suit (as is evident by several college design grades) but I am definitely hoping for the best.:)
Quilting Basics - Quilting 101
One 2½ -hr session

• Basic quilting techniques
• Rotary cutting & pressing
So excited!!!!! And the best part is getting to shop for the fabrics, which is a perfect excuse to visit some of the local shops like www.thequiltingsquares.com/ .
Oh and going through some images on my computer I found a lil' painting of mine that was in a show at the lowercase gallery in Murfreesboro last spring. :)

Monday, January 16, 2012

Oh, what crafty goodness!

This past Saturday was both mine and my fiance's birthday( yes, we have the same bday minus the 5 year difference). We had a lovely late lunch at Buca di Bepo(an Italian Restaurant served family style) after going to the movies treated to us by my mom. But, the highlight was all the goodies we received. I was especially excited by the yarn and new patchwork book. I have been wanting oh so badly to do some quilting but I am admittedly terrified by the thought of it. I imagine tons of pieces and need of precision that I just don't posses. However, the little projects in the Stash Happy book seem much less intimidating. I think I may have to try to make a few of these cute little projects.


Wonky and quilt are two words I have never really associated with each other. My fiance's grandmother is an amazing hand sewing quilt artist who this past December won first place at an Alabama state competition. Her quilts are what I envision a quilt should be, wonky is not. But, I think I could pull off wonky and may have to try. These houses are so cute, albeit delightfully wonky.


My fiance received some metal figures to put together and paint. I was oh so happy to see him crafting. :)

 And I could not help but take advantage of the rainbows my crystals cast on the candle holder dragon that he also got for his birthday. So magical. :)

Winter has finally showed itself...and just as quickly left

On Thursday the 12th winter finally arrived. We had a few flurries here and there earlier this year but nothing that actually stuck. It started as a very dreary day, which warranted some fun crafts. Perler beads! I am admittedly a bit of a nerd/geek so most of my little crafty projects lean to that subject. The perler beads were a gift this past Christmas from my mother who had a fun  time explaining to the cashier that they were for her 25 year old daughter.


I love the 8-bitiness of the fused beads. Such good geekery. ;)

And of course, the snowy weather didn't last long. By the next day it was bright with only a few patches of snow under bushes. Last year we were hit with snow and ice that used up all of this snow days for kids but this year has been much less eventful. At least we got a taste of it. :)

Monday, January 9, 2012

Fiance's Blanket Work in Progress

Look at all these gorgeous colors! For Christmas from my mom, I received these beautiful balls of yarn, which my fiance promptly laid claim. He requested a blanket, so that is where it is headed. The yarn is Red Heart Boutique Treasure in the Mosaic color and is a 70% acrylic to 30% wool blend. The blue is Sensations Lustrous Lamb in Royal and is an 80% acrylic to 20% wool blend. Both yarns are just soooo snuggly soft. :)

I absolutely love the wool blend! I am so used to the 100% acrylic yarns that the wool is a nice change and feels so great and snuggly to work with.

I let him pick out the block he wanted and after alot of adjusting of the original pattern came up with this fun block. I figure I'm wanting a nice big blanket to snuggle under so roughly 6.5ft square should be good. One Mosaic color ball (which is smaller than the blue) gives me about 6-8.5"squares with a little left over.

The pattern is really interesting. I haven't done a spiral before and was a little apprehensive when he picked out the block he liked. However, the block is quite easy to work up and only takes about 45min to complete one block. Don't know how quick that is for others, but for me that is pretty fast. Keeping the two colors connected at all times was different and took some getting used to.

Blocking in the first group.

All sewed together and looking pretty. I sewed them together by holding the blocks together and sewing under both v's using a whip stitch. it makes a really nice seam that isn't visible at all. I used the blue yarn to sew them together since there is plenty more of that left over. I'm looking forward to finishing this blanket. It is super soft and really enjoyable to work on.

Wednesday, January 4, 2012

New Year, New Blog, New Blanket!


Well, what better way to celebrate a new blog than to have a newly completed blanket showing using blocks of my own creation. :)
This is my new blanket just finished and boy do I love it. I used Vanna's Choice Lionbrand and Redheart Supersaver (purple) in 100% acrylic. I love love love Vanna's Choice yarn. It is one of the softest acrylic yarns for the price. It is a bit splitty, but is great to work up with.
And of course I have to add the pic of my pup watching over my blocking right before Christmas. Too cute not to show.